
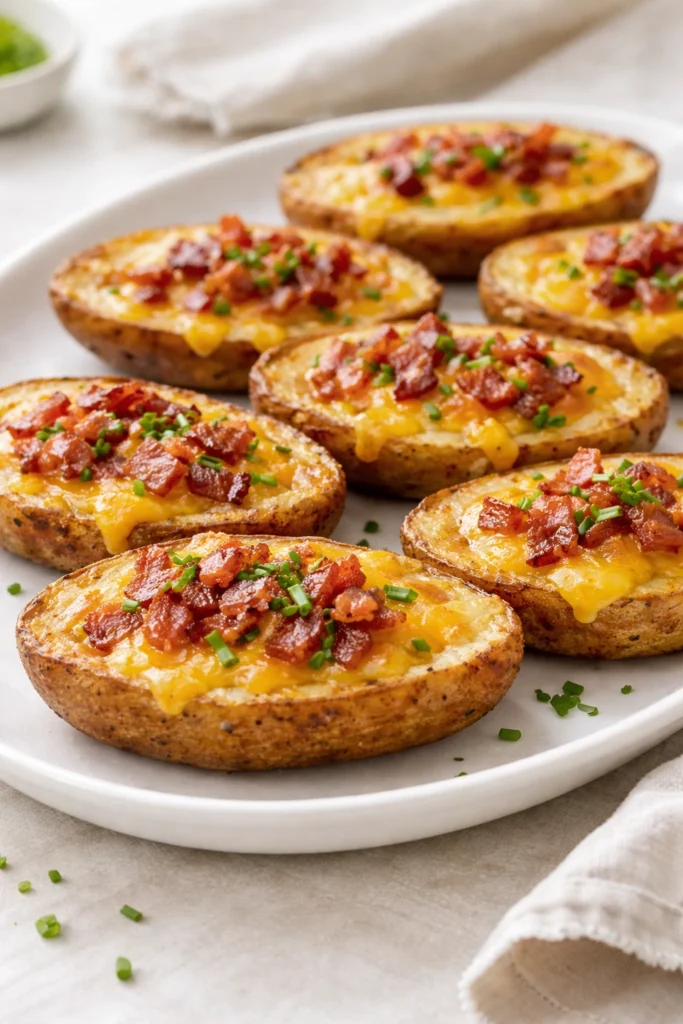
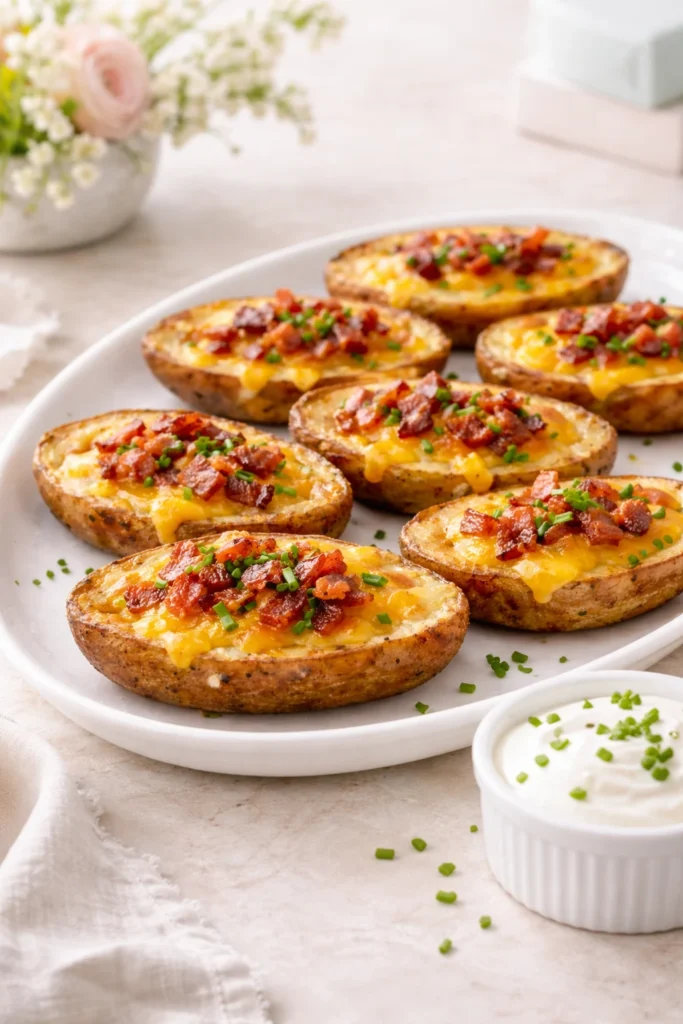
Loaded potato skins are the kind of appetizer that never makes it to the end of the party. With crisp, sturdy shells, fluffy centers, and layers of melted cheese, they strike the perfect balance between comforting and indulgent. Whether you’re planning a baby shower, hosting friends, or building an appetizer table that feels generous and inviting, this recipe delivers dependable results.
If you’ve ever struggled with potato skins that turn soggy, collapse under toppings, or lose their crunch too quickly, this guide solves those problems. Below, you’ll learn 7 proven secrets that help you make loaded potato skins extra crispy, deeply flavorful, and perfectly cheesy every time.
Why Loaded Potato Skins Are Always a Party Favorite
When you’re hosting, you want food that’s easy to serve, easy to eat, and universally appealing. Loaded potato skins check all three boxes.
They’re hearty without being heavy, structured enough to hold toppings, and satisfying in just a few bites. Because they can be prepared in stages, they also work well for baby showers and parties where timing matters and oven space is limited.
Ingredients You’ll Need for Loaded Potato Skins
Simple ingredients create the best texture when they’re used correctly.
Basic ingredients:
- Russet potatoes
- Olive oil or melted butter
- Salt and black pepper
- Shredded cheese (cheddar or a cheddar blend)
- Cooked bacon or preferred savory topping
- Sour cream or yogurt for serving
- Green onions or chives
How to Make Loaded Potato Skins
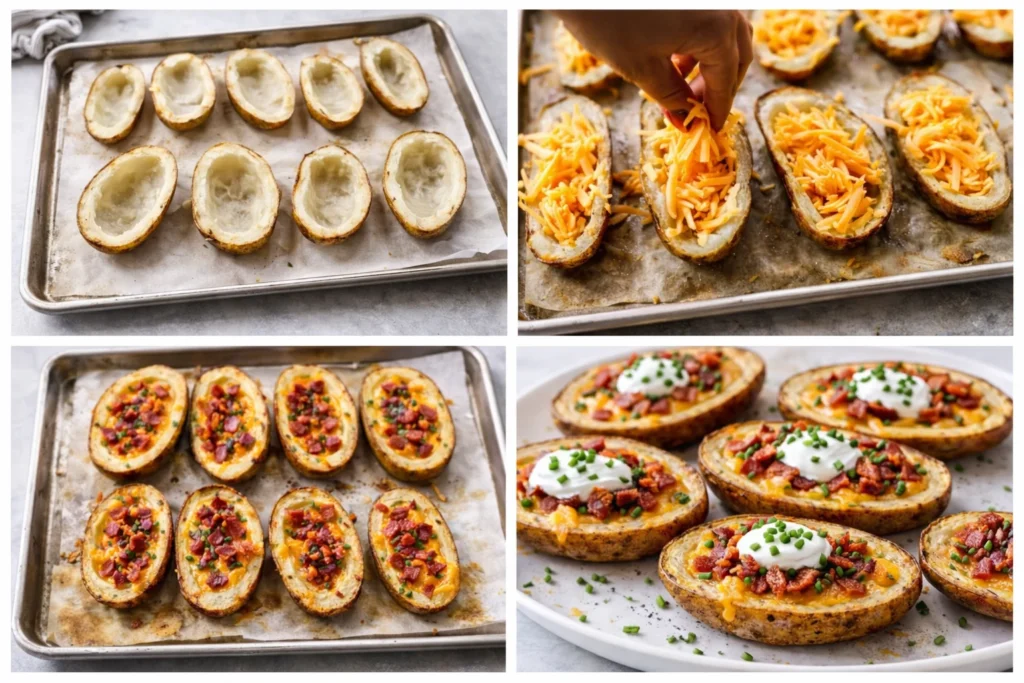
- Bake the potatoes at 400°F (205°C) for 50–60 minutes, until the skins feel dry and slightly papery and a knife slides easily through the center.
- Slice in half and scoop out the centers while warm, leaving about ¼ inch of potato flesh attached.
- Brush both sides with oil or butter and season.
- Bake again at 425°F (220°C) for 18–22 minutes, flipping halfway, until the edges feel firm and lightly blistered.
- Add cheese and toppings.
- Return to the oven for 5–7 minutes, just until the cheese melts and bubbles gently.
7 Secrets for Extra Crispy, Cheesy Results
- Choose the Right Potatoes
For loaded potato skins, russet potatoes are essential.
Their thick skins crisp reliably during baking, and their starchy interior dries out enough to support a second bake. Choose potatoes that are similar in size—about medium to large—so they cook evenly and finish at the same time.
Avoid thin-skinned potatoes, which soften too quickly and struggle to hold their shape once scooped.
- Bake Instead of Boiling
Boiling introduces water into the potato skins, which prevents them from crisping properly later. Baking at 400°F (205°C) allows moisture to evaporate slowly, concentrating flavor and drying the skin just enough for optimal texture.
You’ll know the potatoes are ready when the skins feel slightly leathery to the touch and the interior releases a gentle puff of steam when cut open—soft and fluffy, but not wet.
- Scoop Without Losing Structure
Once baked, let the potatoes cool just enough to handle, then scoop out the centers while they’re still warm. Leave about ¼ inch of potato flesh attached to the skin.
The surface should look lightly textured rather than scraped smooth. This remaining layer reinforces the skin, helps it stay rigid during the second bake, and creates a pleasant contrast between crisp exterior and soft interior.
- Brush with Fat for Maximum Crisp
Before the second bake, brush both the inside and outside of each potato skin generously with fat, paying special attention to the edges. The surface should look lightly glossy, not greasy.
Olive oil produces a drier, crunchier finish with sharper edges, while melted butter delivers richer flavor but browns faster due to its milk solids, resulting in deeper color and a slightly softer bite. Choose based on whether texture or richness is your priority.
Season immediately so the salt adheres evenly.
- Double-Bake for Fully Crisped Skins
Arrange the brushed potato skins cut-side down on a baking sheet and bake at 425°F (220°C) for 10–12 minutes. Flip them over and bake for another 8–10 minutes.
They’re ready when the edges feel rigid when pressed, the bottoms show small blistered spots, and the skins make a faint tapping sound against the pan—clear signs excess moisture has cooked off.
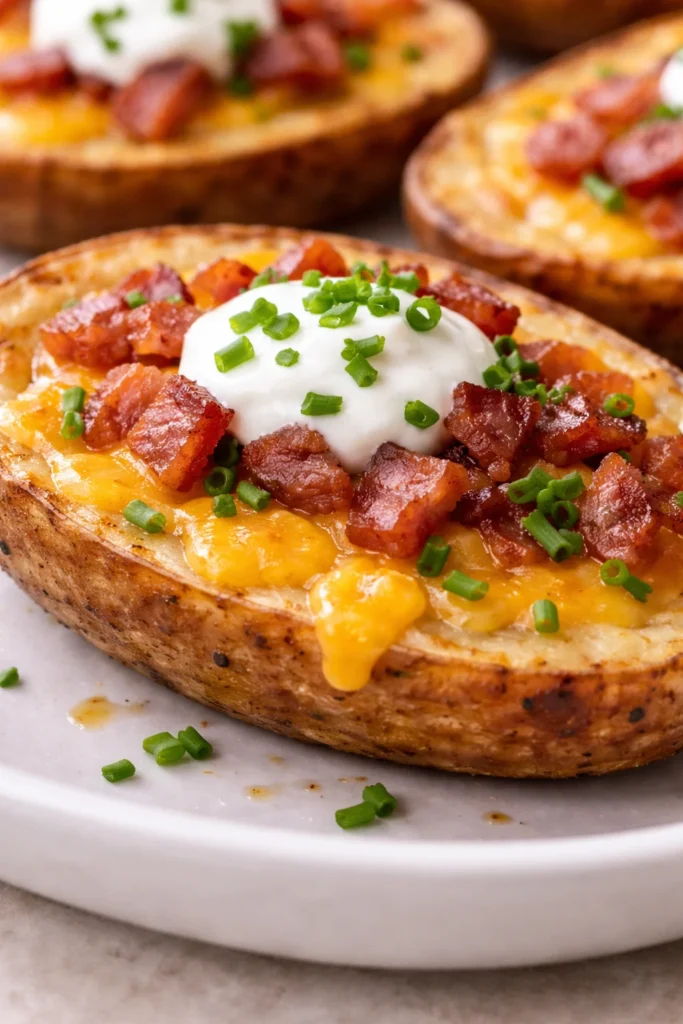
- Layer Cheese the Right Way
Start with a thin layer of shredded cheese pressed directly onto the hot potato skin. Add your toppings, then finish with another light layer of cheese.
During the final bake at 425°F (220°C) for 5–7 minutes, the cheese should melt completely, stretch slightly when lifted, and form tiny bubbles around the edges without excessive browning.
Overloading leads to greasy skins, so restraint is key.
- Finish with the Right Toppings
Fresh toppings should be added after baking to preserve texture and contrast. Green onions, chives, or other fresh garnishes brighten the rich flavors without softening the skins.
Serve creamy elements on the side so guests can customize while keeping the potato skins crisp until the last bite.
Make-Ahead, Storage, and Reheating Tips
Loaded potato skins are ideal for entertaining because they can be prepared in stages.
Make-ahead tips:
- Bake and scoop the potatoes up to 24 hours in advance
- Store the skins covered in the refrigerator
- Complete the second bake and topping just before serving
Storage:
- Refrigerate leftovers in an airtight container for up to 3 days
Reheating:
- Reheat in a 375°F (190°C) oven for 10–12 minutes or in an air fryer for 5–6 minutes
- Avoid microwaving, which reintroduces steam and softens the skins
Common Mistakes to Avoid
Avoid these issues for consistently crisp results:
- Using thin-skinned potatoes
- Skipping the second bake
- Scooping too aggressively
- Overloading with cheese and toppings
- Reheating in the microwave
Correcting even one of these improves texture dramatically.
FAQs About Loaded Potato Skins
Can you make loaded potato skins ahead of time?
Yes. Prepare the skins in advance and finish baking with cheese and toppings just before serving.
How do you keep potato skins crispy?
Bake instead of boil, brush thoroughly with fat, and always double-bake at high heat.
Can loaded potato skins be frozen?
You can freeze the baked, un-topped skins. Reheat until crisp, then add cheese and toppings.
What cheese works best for potato skins?
Cheddar melts evenly and adds strong flavor, but mild blends also work well.
Final Thoughts
With these 7 secrets, you’ll consistently serve loaded potato skins that are crisp, flavorful, and structurally sound. Every step is designed to eliminate sogginess and maximize texture, from potato choice to final bake.
Save this recipe, add it to your party rotation, and explore more crowd-pleasing appetizers that make hosting feel effortless and confident.


Loaded Potato Skins
Ingredients
Instructions
-
Bake the potatoes at 400°F (205°C) for 50–60 minutes, until the skins feel dry and slightly papery.
-
Slice in half and scoop out the centers while warm, leaving about ¼ inch of potato flesh attached.
-
Brush both sides with oil or butter and season.
-
Bake again at 425°F (220°C) for 18–22 minutes, flipping halfway, until the edges feel firm and lightly blistered.
-
Add cheese and toppings.
-
Return to the oven for 5–7 minutes, just until the cheese melts and bubbles gently.